Help for CleverHouse App
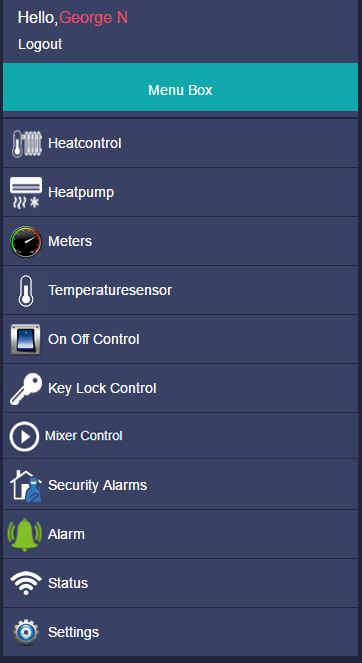

You can find your name at the top left corner and right under it you can log out.

Heatcontrol – overview of your zones

Heatpump – overview of your heatpumps

Meters - overview all of your meters.

Temperaturesensor- overview all of your temperature sensors

On Off Control- overview of electrical appliances connected to On Off Control.

Key Lock Control – overview of doors connected to Key Lock Control.

Mixer Control –overview of central heating controls

Security Alarms - overview of alarms

Alarm - log of alarms

Status – shows if the system is active or not

Settings - various settings
Heatcontrol
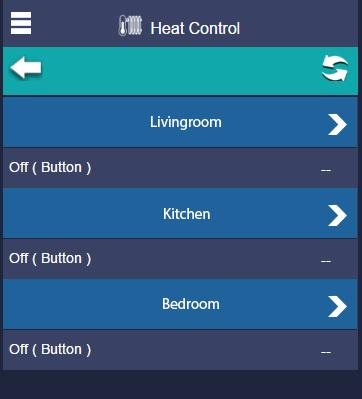
You can see on the screenshot the zones which are active in your installation. It shows also the status of your heat zones. The first temperature is the actual temperature and in the parenthesis you can see the set point. If you want to change the settings, choose the heat zone you want to manage.

By clicking the ”Arrow” you get further to the settings.

”Updating” If you click this button the information will be updated in this zone, by this the changes you just made will be updated.
Settings for the Zones
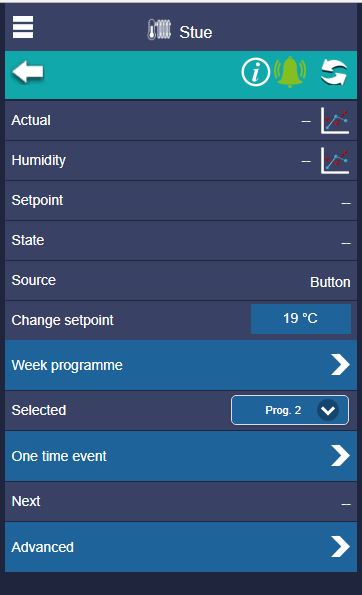

The green ”Alarm” button will turn to red if there is an alarm in relation to the set alarm limits or if there happened an caused by some other fail in this zone.

”Updating” If you click this button the information will be updated in this zone, by this the changes you just made will be updated.

”Actual” Shows the actual temperature measured in this zone. By clicking on the graph button will show the graph of how the temperature was changing in the past.

”Humidity” Shows the actual humidity measured in this zone. By clicking on the graph button will show the graph of how the humidity was changing in the past.

”Setpoint” shows the actual set point.

”State” Indicates if the heating is turned on or off.

”Source” Shows which program is in use or if it is set for manual use.

”Change setpoint” Here you can set the wanted temperature in the zone. This temperature will be active until someone change it or a week program writes it over.

”Week programe” by clicking on the week program opens the settings.
”Selected” Choose which weekly program should be used in this zone.

”One time event” By clicking on it opens the settings of the One time events, where you can set a temperature change at a defined time.

Click the arrow to get further to the "Advanced" menu. Here you can find the settings to ICAL support and set the alarm limits.
Week program settings
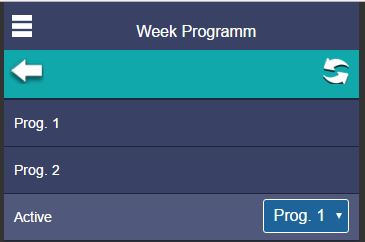
Here you can choose and edit one of the two week programs and also choose which program should be activated.
”Week program 1” by choosing the week program 1 you go further to the settings.
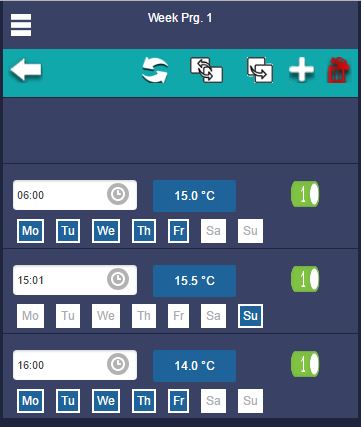
In the top bar you can create a week program for heat control.

By clicking on the ”Add” button you can add a new program line.

The program line gives you the opportunity to set the wanted temperature together with the time and day when the settings should be executed.
Set points will be active until the next set point change override it in the next program line. In case you would like to set different temperature on different days create a new program line with the new settings.

Would you like to copy the settings you created to some other zones so click the ”Replace” button and choose the zone you want to replace by this program settings.

Would you like to simple copy a program line to an other zone, so click the ”copy” button and choose the zone where the program line shod be copied.

Would you like to delete a program line, so click the ”delete” button, choose one or more program line you want to delete and click again the ”delete” button to accomplish the deleting process.
One time event settings
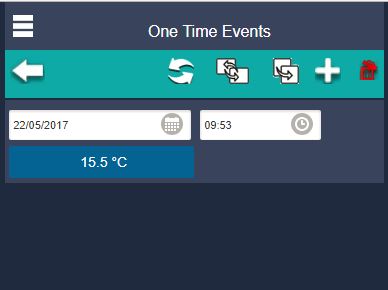
In the top bar you can create a one time event for heat control.

By clicking on the ”Add” button you can add a new program line.

The program line gives you the opportunity to set the wanted temperature together with the exact date and hour when the settings should be executed.
Event will be active until the next event override it in the next program line, or in the week program or the user change it manually.

Would you like to copy the settings you created to some other zones so click the ”Replace” button and choose the zone you want to replace by this program settings.

Would you like to simple copy a program line to an other zone, so click the ”copy” button and choose the zone where the program line shod be copied.

Would you like to delete a program line, so click the ”delete” button, choose one or more program line you want to delete and click again the ”delete” button to accomplish the deleting process.
ICAL Support settings
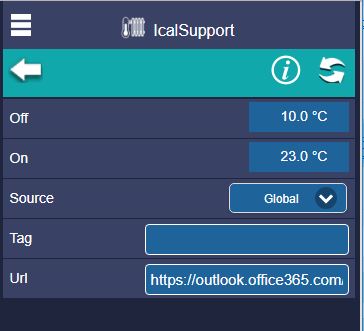
Under ICAL support you can set up a calendar to control the temperature simply by making an event in it.

The “OFF” setting defines what should be the temperature when there is nothing scheduled in the calendar.

Right under this next to the “ON” is the temperature setting when there is some scheduled event in the calendar.

The scroll down menu next to the “SOURCE” gives the possibility to use the calendars features to highlight which room you would like to control.
The “Global” option will activate the heating for each event in the calendar.
The “Location” option let you differentiate which event is dedicated to which room.
The “Attendee” can control the system based on the person is attending the meeting.
By choosing the “Summery” option the events with the same title in the calendar will be turning on the system.

The “TAG” placeholder is where we can specify the searched text for the filters chosen in the “SOURCE” section. Here we can name the location, type in the name of the attendee or specify the title in our calendar.

To set precisely the “URL” is probably the most important task. This is where you specify for the system the link to our calendar. Get the ICS link from your email account and paste it in to the text field.
Here is how you can find the link to your Outlook calendar:
https://help.zolasuite.com/portal/kb/articles/how-do-i-export-my-calendar-from-microsoft-office-365
Here is how you can find the link to your Google calendar:
Alarm limits settings
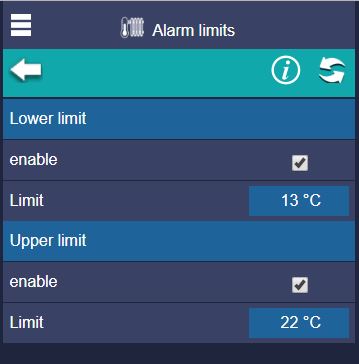
Here you can activate and deactivate alarm and the highest and lowest allowed temperature limits.
Heat pump
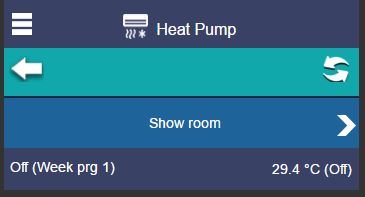
Here you can see the overview of your heat pumps and see if it is on or off and the actual temperature.
You choose the one you want to edit, click on it, so you get further to the settings, where you can set as you want.

By clicking the ”Arrow” you get further to the settings.

”Updating” If you click this button the information will be updated.
Heat pump settings
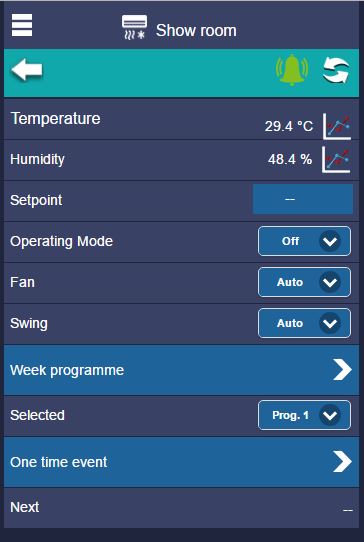
Here is the subpage with all the settings for your heatpump.

”Temperature” Shows you the temperature measured in the Zone. By clicking on the graph button a graph will be shown, how the temperature was changing in the past.

”Humidity” Shows the actual humidity in this Zone. By clicking on the graph button a graph will be shown, how the humidity was changing in the past.

”Setpoint” Shows the actual set point.

”Operating mode” Here you can switch between few options: Off - Auto - Heat - Antifreeze - Cooling - Fan

”Fan” Here you can set up your fan. You can choose if it should work automatic or choose one of the speed settings like, slow, medium or Fast.

”Swing” Here you can choose at how the fan opening should move. The settings can be Auto, horizontal or vertical moving or should stay in the middle state.

”Week programe” by clicking on the week program opens the settings.
”Selected” Choose which weekly program should be used in this zone.

”One time event” By clicking on it opens the settings of the One time events, where you can set a temperature change at a defined time.
”Next” Here you can see what time was the last or when is going to be the next changing.
Week program settings

Here you can choose and edit one of the two week programs and also choose which program should be activated.
”Week program 1” by choosing the week program 1 you go further to the settings.
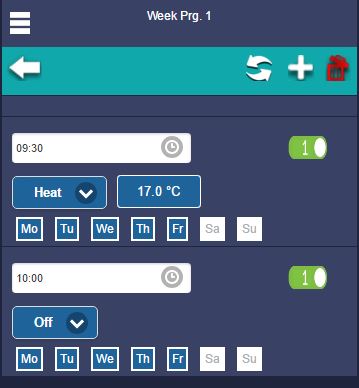
On the top bars you have the possibility of creating a week program for the heat pump.

By clicking on the ”Add” button you can add a new program line.The program line gives you the opportunity to set the wanted temperature and operating mode together with the time and day when the settings should be executed.
Set points will be active until the next set point change override it in the next program line. In case you would like to set different temperature on different days create a new program line with the new settings.

Would you like to copy the settings you created to some other zones so click the ”Replace” button and choose the zone you want to replace by this program settings.

Would you like to simple copy a program line to an other zone, so click the ”copy” button and choose the zone where the program line shod be copied.

Would you like to delete a program line, so click the ”delete” button, choose one or more program line you want to delete and click again the ”delete” button to accomplish the deleting process.
One time event settings
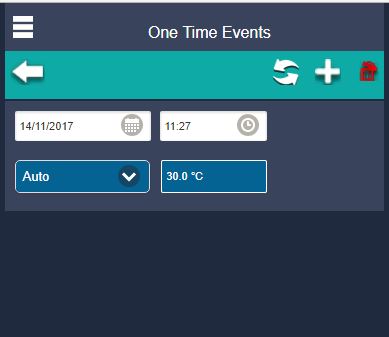
In the top bar you can create a one time event for heat control.

By clicking on the ”Add” button you can add a new program line.

The program line gives you the opportunity to set the wanted temperature together with the exact date and hour when the settings should be executed.
Event will be active until the next event override it in the next program line, or in the week program or the user change it manually.

Would you like to copy the settings you created to some other zones so click the ”Replace” button and choose the zone you want to replace by this program settings.

Would you like to simple copy a program line to an other zone, so click the ”copy” button and choose the zone where the program line shod be copied.

Would you like to delete a program line, so click the ”delete” button, choose one or more program line you want to delete and click again the ”delete” button to accomplish the deleting process.
Meters
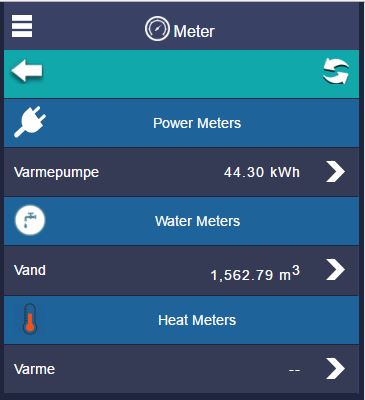
Here you have a collected overview of all the meters.
"Electric meters", "Water meters", "Energy meters"

By clicking the ”Arrow” you get further to the settings.

”Updating” If you click this button the information will be updated in this zone, by this the changes you just made will be updated.
Electric meters
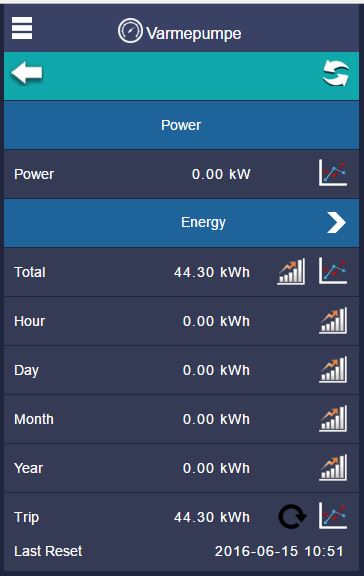
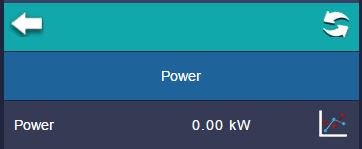
”Power meter” Shows your actual usage.
”Energy” Shows the actual energy usage. By clicking on the graph button will show the graph of how the energy usage was changing in the past.
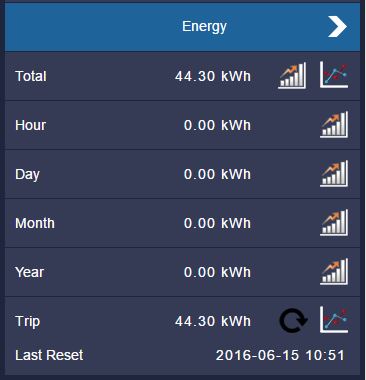
”Energy” Shows the actual overview over a period.

By clicking the ”Arrow” you get further to the settings, set a time period and get the exact energy usage.
”Total” Here you can have an overview of the total energy usage.
”Trip” It is also possible to set a period counter if you want to analyze energy usage in a specific period.

Would you like to see on a graph how was changing the energy usage, so click on the ”Graph” button.

Would you like to see on a bar diagram how was changing the energy usage, so click on the ”Bar diagram” button.
Water meter
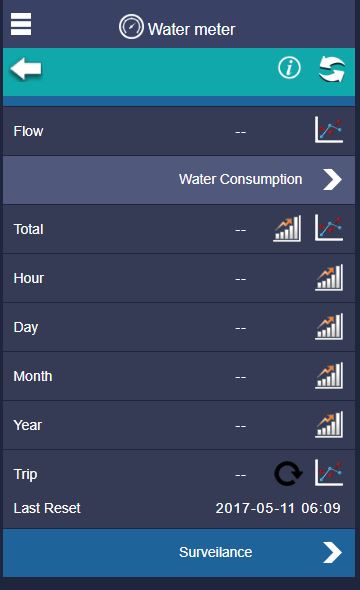
”Water meter” Shows your actual usage.

”Flow” Shows the actual water usage. By clicking on the graph button will show the graph of how the water usage was changing in the past.
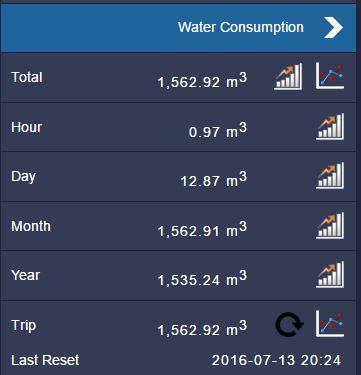
”water consumption” Shows the actual overview over a period.

By clicking the ”Arrow” you get further to the settings, set a time period and get the exact water consumption.
”Total” Here you can have an overview of the total water consumption.
”Trip” It is also possible to set a period counter if you want to analyze water consumption in a specific period.

Would you like to see on a graph how was changing the water consumption, so click on the ”Graph” button

Would you like to see on a bar diagram how was changing the water consumption, so click on the ”Bar diagram” button

Click the arrow next to "Surveilance" to get further to the advanced menu.
Surveilance settings
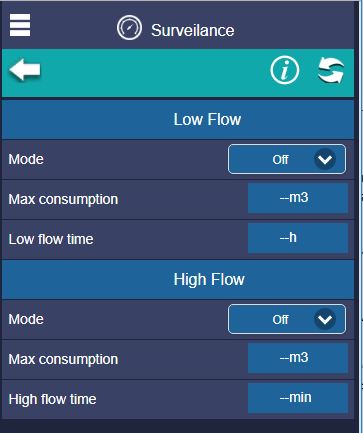
LOW FLOW

The scroll down menu next to the mode allows to choose from “Off”, “Auto” and “Manual” options.
The “Off” will turn off, the “Auto” will use predefined settings meanwhile the “Manual” offers the most precise fine-tuning option for error detection in the system.

The “Max consumption” field allows to set the amount of water and the “Low flow time” field the time interval within we consider to be normal consumption. If the amount exceeds this, it is indicating slow leakage. In case of such situation we will be notified in a message.
HIGH FLOW

The scroll down menu next to the High Flow allows to choose from “Off”, “Auto” and “Manual” options.
The “Off” will turn off, the “Auto” will use predefined settings meanwhile the “Manual” offers the most precise fine-tuning option for error detection in the system.

The “Max consumption” field allows to set the amount of water and the “High flow time” field the time interval within we consider to be normal consumption. If the amount exceeds this, it is indicating broken pipeline or fitting. In case of such situation we will be notified in a message.
Heat meters
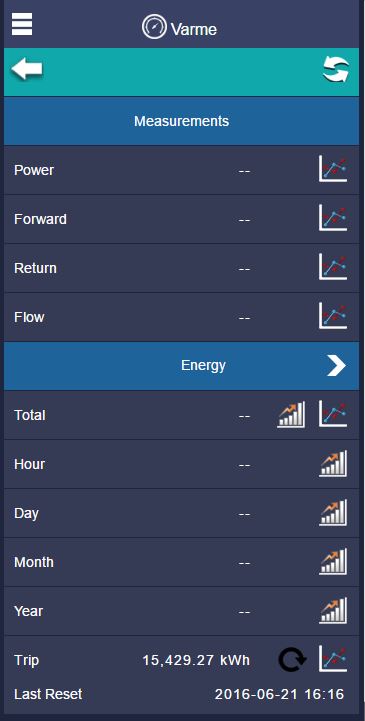
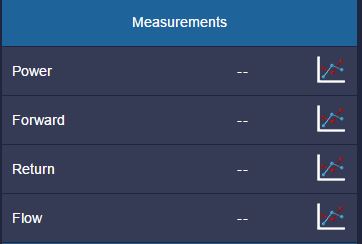
”Power” Shows your actual usage. flow
”Forward” Shows your actual input heat.
”Rerturn” Shows your rerturn heat.
”Flow” Shows your actual flow.
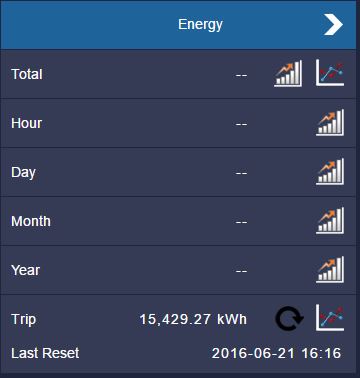
”Energy” Shows the actual overview over a period.

By clicking the ”Arrow” you get further to the settings, set a time period and get the exact consumption.
”Total” Here you can have an overview of the total consumption.
”Trip” It is also possible to set a period counter if you want to analyze consumption in a specific period.

Would you like to see on a graph how was changing the consumption, so click on the ”Graph” button

Would you like to see on a bar diagram how was changing the consumption, so click on the ”Bar diagram” button
Temperature sensors
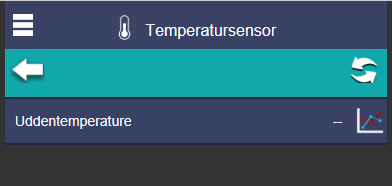
Here you have a collected overview of your temperature sensors.

Would you like to see on a graph how was changing the temperature, so click on the ”Graph” button.
On Off Control
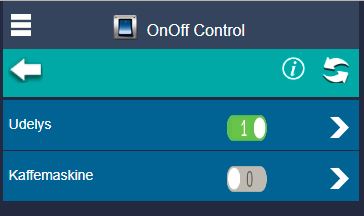
Here you have overview over what can you turn On or Off and you can also control it directly from here.

By clicking the ”Arrow” you get further to the settings.

”Updating” If you click this button the information will be updated on this page.
On Off Control settings
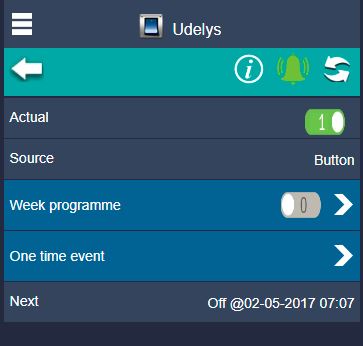
if you click on the different On Off setups, you will get a collected overview at they ar turned on or off or following one of the week programs.

By clicking the ”Arrow” you get further to the settings, where you can add a new week program or a one time event.
Week program settings
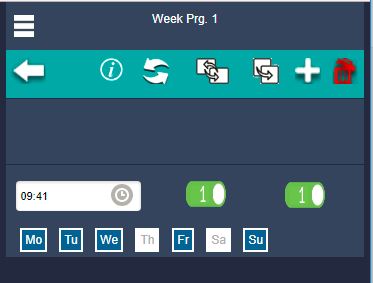
In the top bar you can create a week program for on off control.

By clicking on the ”Add” button you can add a new program line.The program line gives you the opportunity to set the wanted time and day when the settings should be executed.
Set points will be active until the next set point change override it in the next program line. In case you would like to set different temperature on different days create a new program line with the new settings.

Would you like to copy the settings you created to some other zones so click the ”Replace” button and choose the zone you want to replace by this program settings.

Would you like to simple copy a program line to an other zone, so click the ”copy” button and choose the zone where the program line shod be copied.

Would you like to delete a program line, so click the ”delete” button, choose one or more program line you want to delete and click again the ”delete” button to accomplish the deleting process.

On Off button on the left, you use to define whether this program line is active or not, the right one to completely disable this program line, so it will be not able to turn on off automatically.
One time event settings
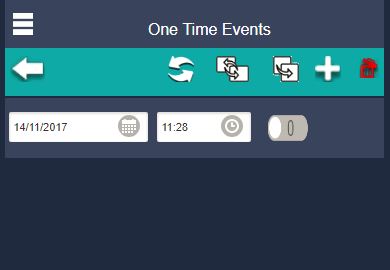
In the top bar you can create a one time event for OnOff control.

By clicking on the ”Add” button you can add a new program line.

The program line gives you the opportunity to choose between turning ON or OFF the unit and set the exact date and hour when the event should be executed.
Event will be active until the next event override it in the next program line, or in the week program or the user change it manually.

Would you like to copy the settings you created to some other unit setting, so click the ”Replace” button and choose the unit you want to replace by this program settings.

Would you like to simple copy a program line to an other unit setting, so click the ”copy” button and choose the unit where the program line shod be copied.

Would you like to delete a program line, so click the ”delete” button, choose one or more program line you want to delete and click again the ”delete” button to accomplish the deleting process.
Key Lock Control
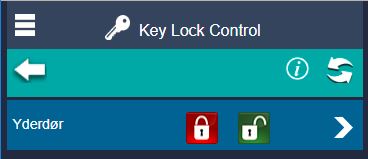
Here you have overview over which door is connected to the key lock control system and you can also control it directly from here.

By clicking the ”Arrow” you get further to the settings.
Key Lock Control settings
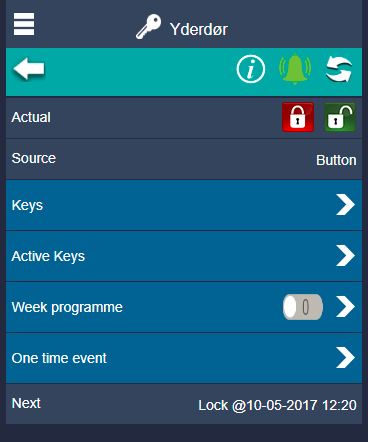

Here can you create a new SMS code keys and manage the existing ones.

Here are shown only the active keys.

Here you can set programs for each day of the week to control when the door should automatically lock or unlock.

Here you can set a program for a specific dato to lock or unlock the door.
Keys settings
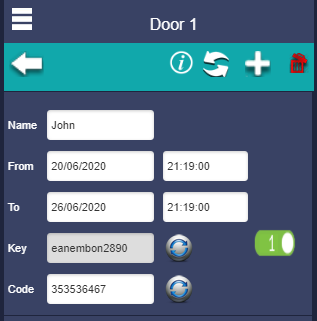

You can create a new SMS code key by clicking on the ”Add” button.
You can Give a meaningful name to remember who you give access. Set the beginning and ending date and time to define the time periode when the code should be active. The code will be generated automaticaly when you click the ![]() button on the right side and you will find it in the bottom line.
Code can only be used by local card reader. You may edit the code of your choice.
button on the right side and you will find it in the bottom line.
Code can only be used by local card reader. You may edit the code of your choice.

By clicking the refresh button you can generate a new code in case the old one got corrupted.

By clicking the enable/disable button you can enable or disable the key.

Would you like to delete a key, so click the ”delete” button, choose a key you want to delete and click again the ”delete” button to accomplish the deleting process.
How to lock and unlock door with SMS code?
Just send an SMS to
+45 93 87 71 71
with the text
Key kode unlock
or
Key kode lock
You can easily open or close the door by sending an SMS. In the SMS after the "Key" word you should type in the code you got earlier and finish with "lock" or "unlock" depending what you want do do.
Week program settings
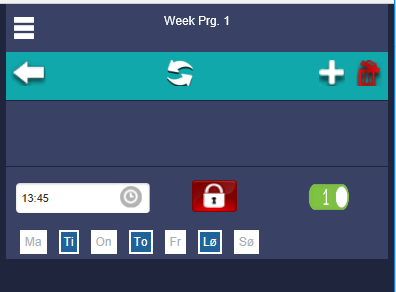
By choosing the week programs, you navigate further to the settings. Here, in the top bar you can create a new week program.

By clicking on the ”Add” button you can add a new program line.The program line gives you the opportunity to set the wanted temperature and operating mode together with the time and day when the settings should be executed.
Set points will be active until the next set point change override it in the next program line. In case you would like to set different temperature on different days create a new program line with the new settings.

Would you like to delete a program line, so click the ”delete” button, choose one or more program line you want to delete and click again the ”delete” button to accomplish the deleting process.
One time event settings
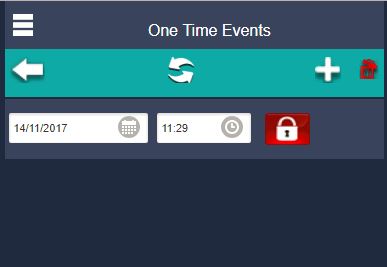
In the top bar you can create a one time event for key lock control.

By clicking on the ”Add” button you can add a new program line.

The program line gives you the opportunity to choose between opening or closing the door and set the exact date and hour when the event should be executed.
Event will be active until the next event override it in the next program line, or in the week program or the user change it manually.

Would you like to delete a program line, so click the ”delete” button, choose one or more program line you want to delete and click again the ”delete” button to accomplish the deleting process.
Mixer Control
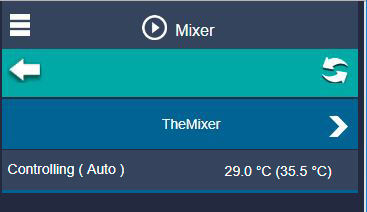
Here you have overview over which of your Central Heating control units.

By clicking the ”Arrow” you get further to the settings.
Overview of the Mixer Control function
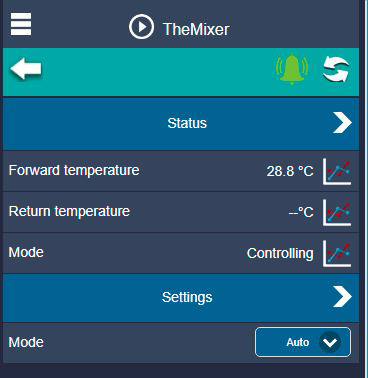

By clicking on the “arrow” next to the “Status” you can read more detailed info about the system settings.

The actual temperature entering the system.

The actual temperature exiting the system.

Shows the status of the system.

By clicking on the “arrow” next to the “Settings” you can set how the system should function.

In the roll down menu you can set which setting should be applied.
Mixer Control settings
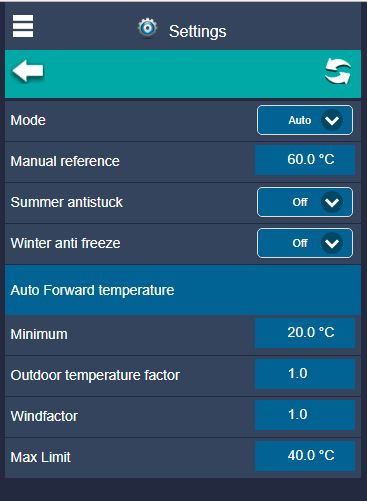

In the roll down menu you can set which setting should be applied. You can choose from “Auto”, “Stop”, “Pump” and “Manual” options.

In this line we can tell the system what is the temperature we would like to see when the Manual mode is active.

The “Summer antistuck” is designed for protect the system from rusting due long stop period in the summer time. It´s function is to turn on the system daily for a short maintains cycle.

The “Winter anti freeze” is for the winter season to protect the system from experiencing freeze damage. By time to time circulating warm water in the system the tubes can’t reach the freezing point.
Auto Forward temperature
In the following lines we can set how the automatic function should control the system temperature.

In this line we can tell the system what is the minimum temperature we would like to see.

When the temperature outside falls under the normal temperature, it is needed to adjust the system accordingly. Here we can set how many degrees should be increased the systems temperature for each Celsius drop under the normal temperature.

When strong wind is blowing it has effect on the inner temperature, and that is important to take in consideration. Here we can set how many degrees should be increased the systems temperature accordingly to each meter per second wind speed we measure.

In this line we can tell the system what is the maximum temperature we would like to see.
Security Alarm
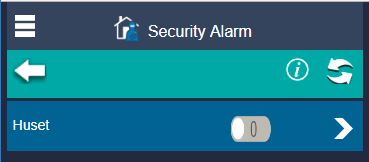
Here you have a collected overview of your alarms.

By clicking the ”Arrow” you get further to the settings.

”Updating” If you click this button the information will be updated in this window.
Security Alarm settings
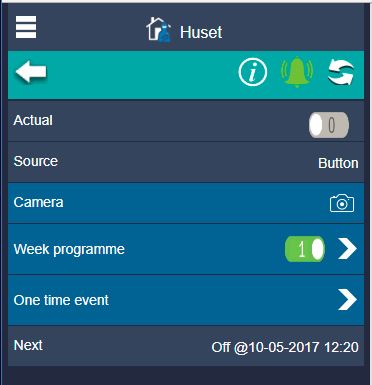

”Actual” her you can see if the alarms are activated or not and can manage them as well.

”Camera” Here you have overview of your installed cameras (Standard ip-camera). When the alarm is on and the motion sensors sense some activity the camera will make pictures and save them on the server. You can see them by clicking on the camera button.
Week program settings
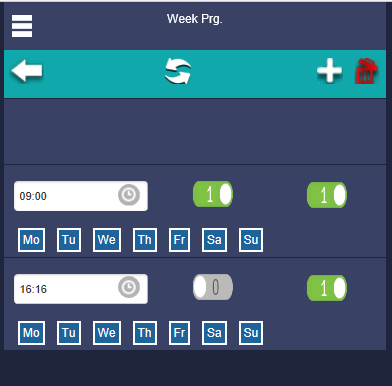
By choosing the week programs, you navigate further to the settings. Here, in the top bar you can create a new week program.

By clicking on the ”Add” button you can add a new program line.The program line gives you the opportunity to set the wanted temperature and operating mode together with the time and day when the settings should be executed.
Set points will be active until the next set point change override it in the next program line. In case you would like to set different temperature on different days create a new program line with the new settings.

Would you like to copy the settings you created to some other zones so click the ”Replace” button and choose the zone you want to replace by this program settings.

Would you like to simple copy a program line to an other zone, so click the ”copy” button and choose the zone where the program line shod be copied.

Would you like to delete a program line, so click the ”delete” button, choose one or more program line you want to delete and click again the ”delete” button to accomplish the deleting process.

On/Off button on the left you can use to turn on or off the alarm and the one on the right deactivates completely this program line so it will prevent also the automatic turning on off in case you don't want to use it anymore.
One time event settings
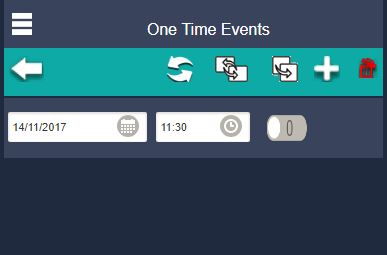
In the top bar you can create a one time event for security alarm.

By clicking on the ”Add” button you can add a new program line.

The program line gives you the opportunity to choose between turning ON or OFF the alarm and set the exact date and hour when the event should be executed.
Event will be active until the next event override it in the next program line, or in the week program or the user change it manually.

Would you like to copy the settings you created to some other unit setting, so click the ”Replace” button and choose the alarm settings you want to replace by this program settings.

Would you like to simple copy a program line to an other unit setting, so click the ”copy” button and choose the alarm settings where the program line shod be copied.

Would you like to delete a program line, so click the ”delete” button, choose one or more program line you want to delete and click again the ”delete” button to accomplish the deleting process.
Alarm
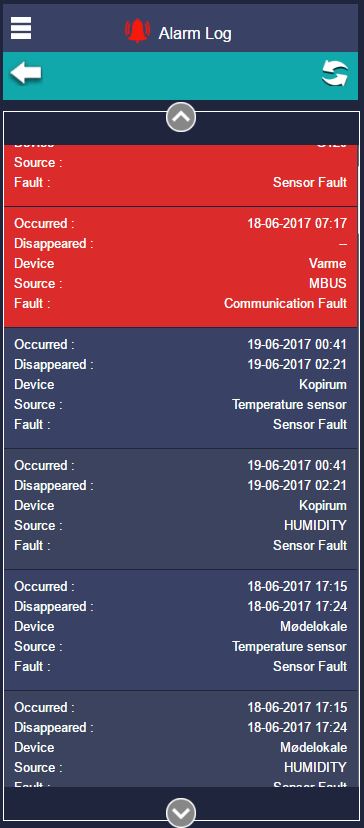
Under this section you can see the logs generated in the system by the alarms.


Alarm symbol is green when it is no alarm happening, it turns red to signalize there is some failure in the system.
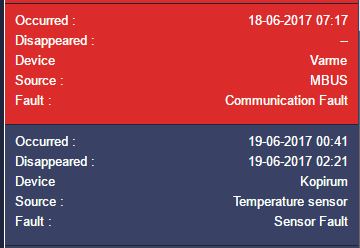
Here you can check the alarm reports generated in the system. The active alarms are highlighted by red the fixed ones turn blue.
Here you can read about the description of the fault, date when the problem happened and when it stopped, what device was failing in what zone.
Settings
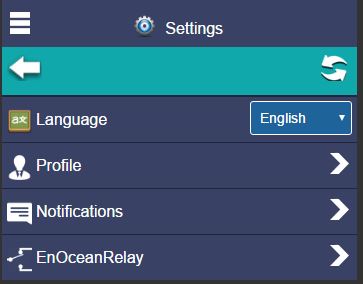

”Language” here you can choose a language. You can choose from English - Danish - Norwegian or German.

By clicking the ”Arrow” you get further to the settings.

By clicking the ”Arrow” you get further to the settings.

”EnOceanRelay” Here you can pair your EnOcean Relay.
Profile settings
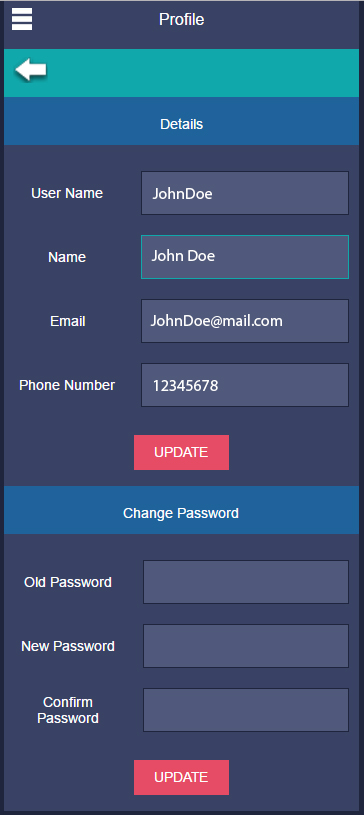
”Profile” Here you can see and set your user name - name - email address and telephone number. If you need to change your password, it is here where you can do it. After you made some changes remember to save them by clicking on the ”update” button.
Notification settings
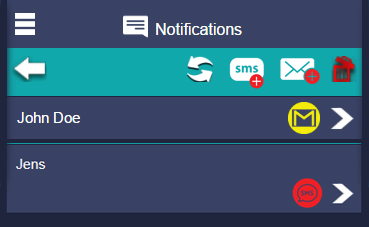
”Notifications” This is where you can set notifications to be send to you about the operation of the system.


You can choose between or both receive sms and mail. By clicking the mail or sms button ypu go further to the settings. Here you can set up to whom to send the messages.

Would you like to delete an old setting, so click the ”delete” button, choose one or more of the settings you want to delete and click again the ”delete” button to accomplish the deleting process.
Settings for mail and SMS
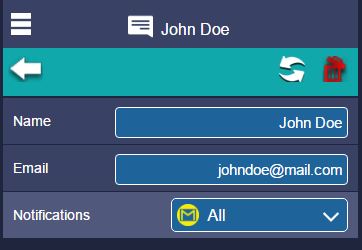
Here you can set up the email address or phone number and name of the person to whom the messages should be sent. Also it is here where you can set up the type of message should be sent, there you can choose between all or non of the messages should be sent or you can choose from one of the priority classes.
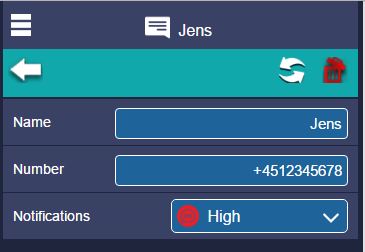
With the “High” option you narrow down the choice to only receive the highest priority messages.
By choosing the “Middle” you will receive besides the lower priority messages also the High priority ones.
The “All” and “None” will end up sending all or none of the messages.
In case you are interested to get more detailed info, please contact your installer and ask for the list to figure out how are the different alarms categorized.